Next JS is a server-side framework with a focus on performance. It is also one of the most popular JavaScript frameworks in the world.
Next JS is made to perform server-side rendering for react apps. Next JS is specially used when you get issues in SEO (Search Engine Optimization) while using react client-side rendering.
If you fetch API or some data from the database by using the Next JS server-side feature, it will take few minutes to load and until then Next JS will not change the route and the page will stuck which makes the user experience poor.
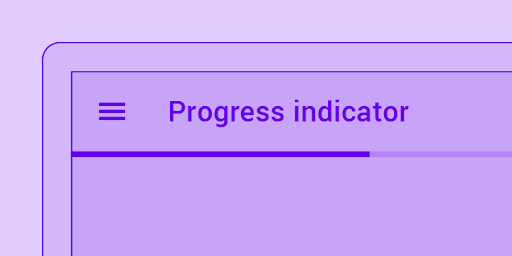
The solution for this problem is to show a top progress bar in Next JS website until the data from the server is loaded into the website.
The first step is to create a new Next JS project. Skip this step if you want to add a top progress bar to your existing Next JS website.
Run this command in the terminal. After that, give the required information.
npx create-next-app@latestWe need an NPM Package that is react-top-loading-bar. Install it by the below command. NPM Package Link
npm i react-top-loading-barNow start the development server by running :
npm run devOur next step is to create a logic to show the top progress bar, goto pages/_app.js, and import required things.
import { useEffect, useRef } from 'react';
import LoadingBar from 'react-top-loading-bar';
import { useRouter } from 'next/router';
Now we need to add the LoadingBar component in our _app.js and we also need to create a reference for it. You can read about the props of LoadingBar from here. I have just set the color and height of LoadingBar. Keep in mind our LoadinBar will be shown at the top of our website page when a user change the route.
function MyApp({ Component, pageProps }) {

  const loadingRef = useRef(null);

  return (

     <>
       <LoadingBar color='#F44336' height={3} ref={loadingRef} />
       <Component {...pageProps} />
     </>

  );

export deafult MyApp;
Next JS provides a router event listener which we can use to show the top progress bar. Using Next JS router events is very easy. Check the below code.
  //using next js useRouter hook.
  const router = useRouter();


  useEffect(() => {

    const handleRouteChange = (url, { shallow }) => {

      //Route Change Event

    }

    const handleRouteComplete = (url, obj) => {
      //Route Change Completed Event
    }

    //Setting Events
    router.events.on('routeChangeStart', handleRouteChange);
    router.events.on('routeChangeComplete', handleRouteComplete)

    // If the component is unmounted, unsubscribe
    // from the event with the `off` method:
    return () => {

      router.events.off('routeChangeStart', handleRouteChange);
      router.events.off('routeChangeComplete', handleRouteComplete);

    }

  }, []);
react-top-loading-bar provides some methods to show, increase progress, and hide the top progress bar. These methods work by using the reference of LoadingBar. It’s better to use these methods with try-catch blocks because the reference will be null until our component is mounted.
const router = useRouter();


  useEffect(() => {

    const handleRouteChange = (url, { shallow }) => {

      //Start the progress bar because the route is changed !
      try{
        loadingRef.current.continuousStart();
      }
      catch (err) {

      }

    }

    const handleRouteComplete = (url, obj) => {

      //Make the progress bar 100% because our route load is completed !
      try {
        loadingRef.current.complete();
      }
      catch (err) {

      }
    }

    router.events.on('routeChangeStart', handleRouteChange);
    router.events.on('routeChangeComplete', handleRouteComplete)

    return () => {

      router.events.off('routeChangeStart', handleRouteChange);
      router.events.off('routeChangeComplete', handleRouteComplete);

      //Complete the progress if component unmounted !
      try {
        loadingRef.current.complete();
      }
      catch (err) {

      }

    }

  }, []);
Complete Code :
import { useEffect, useRef } from 'react';
import LoadingBar from 'react-top-loading-bar';
import { useRouter } from 'next/router';


function MyApp({ Component, pageProps }) {

  const loadingRef = useRef(null);
  const router = useRouter();

   useEffect(() => {

      const handleRouteChange = (url, { shallow }) => {

         //Start the progress bar because the route is changed !
         try{
           loadingRef.current.continuousStart();
         }
         catch (err) {

         }

      }

      const handleRouteComplete = (url, obj) => {

        //Make the progress bar 100% because our route load is completed !
        try {
          loadingRef.current.complete();
        }
        catch (err) {

        }
      }

      router.events.on('routeChangeStart', handleRouteChange);
      router.events.on('routeChangeComplete', handleRouteComplete)

      return () => {

        router.events.off('routeChangeStart', handleRouteChange);
        router.events.off('routeChangeComplete', handleRouteComplete);

        //Complete the progress if component unmounted !
        try {
          loadingRef.current.complete();
        }
        catch (err) {

        }

      }

    }, []);

  return (

     <>
       <LoadingBar color='#F44336' height={3} ref={loadingRef} />
       <Component {...pageProps} />
     </>

  );


}

export default MyApp;
This is all you need to do to show a top progress bar in Next JS. Now whenever you change the route, you will see a progress bar on top of your web page.
READ : How to get form data in react without using useState() hook.